안녕하세요.
이번 시간에는 배너 알림에 대해 아이콘을 변경해보려고 합니다.
시작 전 방향성(Notification Banner)
저도 구글이나 네이버에 검색 했을 때 Info.plist에 어떤 것을 넣고 또 Signing & Capability에서 추가하고 이런 방식들이었는 데,
제 지식이 못 받아드리는 건지 잘 모르겠더라고요. 그래서 저는 정말 간단하게 코드 3줄 추가하고 끝내보려고 합니다.
사용자에게 배너 알림 보내기
private func scheduleNotification() {
guard UserDefaults.standard.bool(forKey: "notificationsEnabled"),
let targetDate = targetDate else { return }
let content = UNMutableNotificationContent()
content.title = "타이머 완료"
content.body = "오늘 하루도 열심히 보내셨네요!"
content.sound = .default
let trigger = UNCalendarNotificationTrigger(
dateMatching: Calendar.current.dateComponents([.year, .month, .day, .hour, .minute, .second], from: targetDate),
repeats: false
)
let request = UNNotificationRequest(identifier: "timerComplete", content: content, trigger: trigger)
UNUserNotificationCenter.current().add(request)
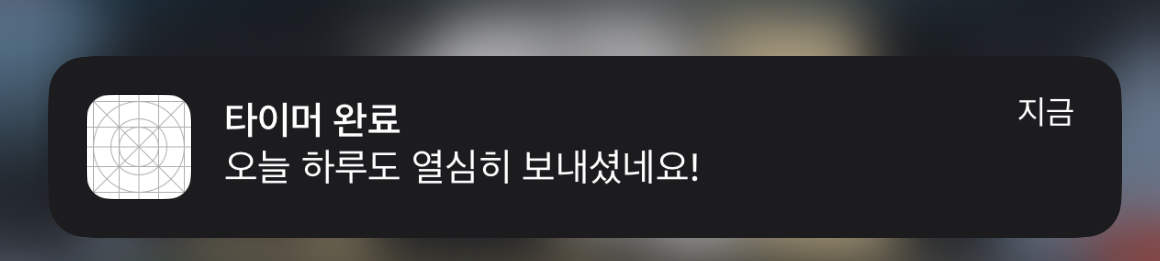
}위 코드는 타이머 기능에 쓰이는 함수인데, 해당 함수를 불러오면 타이머 시간에 맞춰 아래 이미지와 같이 배너 알림을 보내줍니다.
이 기능은 앞서 권한 설정을 해야 하지만, 이 글의 목적은 배너 아이콘이니 넘어가도록 하겠습니다. 원하신다면 댓글 달아주시면 해당 글을 새로 작성해보겠습니다.
배너 아이콘 변경하기
아래 코드에 3줄을 추가하면 배너 아이콘을 변경할 수 있습니다.
private func scheduleNotification() {
    guard UserDefaults.standard.bool(forKey: "notificationsEnabled"),
          let targetDate = targetDate else { return }

    let content = UNMutableNotificationContent()
    content.title = "타이머 완료"
    content.body = "오늘 하루도 열심히 보내셨네요!"
    content.sound = .default

    // 알림 아이콘 추가
    if let url = Bundle.main.url(forResource: "NotificationIcon", withExtension: "png"),
       let attachment = try? UNNotificationAttachment(identifier: "icon", url: url, options: nil) {
        content.attachments = [attachment]
    }

    let trigger = UNCalendarNotificationTrigger(
        dateMatching: Calendar.current.dateComponents([.year, .month, .day, .hour, .minute, .second], from: targetDate),
        repeats: false
    )

    let request = UNNotificationRequest(identifier: "timerComplete", content: content, trigger: trigger)
    UNUserNotificationCenter.current().add(request)
}
주석으로 달아둔 if문 입니다. 해당 if문에 대한 자세한 설명은 다음과 같습니다.
- Bundle.main.url(forResource:withExtension:)을 사용하여 프로젝트에 추가된 이미지 파일의 URL을 가져옵니다.
- UNNotificationAttachment를 생성하여 이미지를 알림에 첨부합니다.
- content.attachments에 생성된 attachment를 설정합니다.
이제 배너에 사용할 png 이미지를 Assets에 저장하면 됩니다. 저는 'NotificationIcon'이라고 칭하고 저장 했습니다.
결과 확인 : 실행해보기
먼저 Clean Build Folder를 해주시고 기기에서 테스트해주시길 바랍니다.
다음과 같이 결과가 나옵니다!

복잡하지 않고 코드 3줄 추가로 쉽게 끝내봤습니다. 앱 개발하시는 분들 도움 되셨으면 합니다. 또 아이콘 배너가 아닌
"지금"이라고 텍스트 하단에 이미지를 넣는 방법도 있습니다. 그 부분이 궁금하시다면 아래를 참고해주시면 됩니다.
참고: https://sy-catbutler.tistory.com/61
'개발하기 > SwiftUI' 카테고리의 다른 글
| SwiftUI에서 Lottie 애니메이션으로 프로페셔널한 로딩 화면 만들기 (0) | 2025.07.09 |
|---|---|
| [개발 기능 소개] Swift 앱에서 한글 파일(HWP) 선택 및 관리 기능 구현하기 (0) | 2025.03.23 |
| SwiftUI Admob 사용 가능한 상태인지 확인하는 방법: 'nil' requires a contextual type (0) | 2025.02.06 |
| Xcode에서 Pod init해결 방법 (0) | 2024.12.06 |
| error: unable to read property list from file: (0) | 2024.12.03 |


